Assignment #2 - ISO
I can select the proper ISO depending on the amount of light which is available knowing how it will affect the image.
Camera Settings: M
Photos: 7 photos of the same object up close
Photoshop: Layout of all the images with the ISO labeled and 1 screenshot
Total of 9 images due
1. ISO - You will be taking one image (like example on this page) using 7 different ISO's 100 - 200 - 400 - 800 - 1600 - 3200 - 6400. Keep your light meter centered. To achieve the highest quality your images should be taken outdoors. Camera mode can be set to TV/AV or Manual which ever mode you select remember to keep your meter centered. Now you have used the 3 elements of exposure to capture your images.
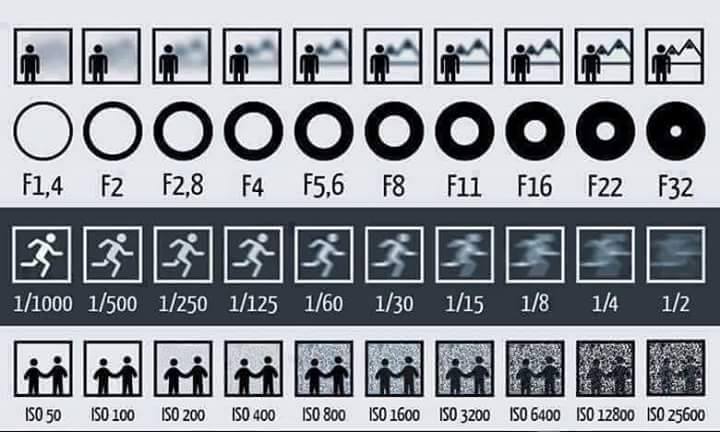
All Film has a speed rating, whether digital or traditional. The measurement of this as ASA or ISO which stands for ‘International organization for Standardization’. The ISO rating describes how quickly the film/sensor reacts to light. Film speed uses stops, just like shutter and aperture, going from ISO 50 to ISO 200 gives you 2 stops more of light.
Slow ISO: ISO less than 200. Best for bright lighting conditions and outdoor photography. Slower ISO are less sensitive and generally require longer exposures and more light. They generally produce sharper, more detailed images. Often times a tripod is required with lower ISO.
Medium ISO: 400 is an all purpose speed which can be used for most situations. Doesn’t need a large amount of light and can stop motion.
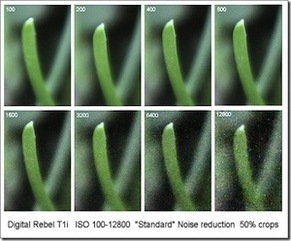
Fast ISO: 800 and up (6400) Fast ISO reacts rapidly and can be used in lower light situations and require shorter exposures. Faster ISO should not be printed larger than an 8x10 due to the noticeable amount of noise within the image. Noise is undesirable flecks of random color within image in an area which should consist of smooth color. It is caused from using fast ISO and long shutter speeds.
PHOTOSHOP: Crop each image into a smaller section (this will allow you to see the increasing of the grain within the images your ISO goes up) of the whole image you took, similar to the example of this page. Move them all onto one canvas and label them with the correct ISO. Rename images in iPhoto and export using title.
Create a new canvas (File>New) 3000x2000 pixels. Label each layer with the ISO.
Tools:
Use Google Classroom and direction on how to label the images can be found there.
Camera Setting - M mode
Labeling images:
Last Name (with ISO)
Total of 9 images
Camera Settings: M
Photos: 7 photos of the same object up close
Photoshop: Layout of all the images with the ISO labeled and 1 screenshot
Total of 9 images due
1. ISO - You will be taking one image (like example on this page) using 7 different ISO's 100 - 200 - 400 - 800 - 1600 - 3200 - 6400. Keep your light meter centered. To achieve the highest quality your images should be taken outdoors. Camera mode can be set to TV/AV or Manual which ever mode you select remember to keep your meter centered. Now you have used the 3 elements of exposure to capture your images.
All Film has a speed rating, whether digital or traditional. The measurement of this as ASA or ISO which stands for ‘International organization for Standardization’. The ISO rating describes how quickly the film/sensor reacts to light. Film speed uses stops, just like shutter and aperture, going from ISO 50 to ISO 200 gives you 2 stops more of light.
Slow ISO: ISO less than 200. Best for bright lighting conditions and outdoor photography. Slower ISO are less sensitive and generally require longer exposures and more light. They generally produce sharper, more detailed images. Often times a tripod is required with lower ISO.
Medium ISO: 400 is an all purpose speed which can be used for most situations. Doesn’t need a large amount of light and can stop motion.
Fast ISO: 800 and up (6400) Fast ISO reacts rapidly and can be used in lower light situations and require shorter exposures. Faster ISO should not be printed larger than an 8x10 due to the noticeable amount of noise within the image. Noise is undesirable flecks of random color within image in an area which should consist of smooth color. It is caused from using fast ISO and long shutter speeds.
PHOTOSHOP: Crop each image into a smaller section (this will allow you to see the increasing of the grain within the images your ISO goes up) of the whole image you took, similar to the example of this page. Move them all onto one canvas and label them with the correct ISO. Rename images in iPhoto and export using title.
Create a new canvas (File>New) 3000x2000 pixels. Label each layer with the ISO.
Tools:
- Crop Tool (C)
- Ruler (Cmd+R) - pull guidelines from the ruler
- Undo/Redo (Cmd+Z)
- Step Backwards (Opt+Cmd+Z)
- Make sure the box Show Transform Controls in check in the Move tool menu.
- Hold your Shift key to constrain the image while resizing the image.
Use Google Classroom and direction on how to label the images can be found there.
Camera Setting - M mode
Labeling images:
Last Name (with ISO)
Total of 9 images
3 of the 4 factors of exposure (light is the 4th)